Inclusive Seating is a free, browser-based classroom seating chart tool. No account, no paywall, no ads. You open it, set up your class, and generate a seating chart that actually accounts for your students' needs. If you have ever spent a Sunday afternoon manually juggling names on a grid trying to keep two students apart while also keeping another close to your desk and making sure a third has a clear path to the exit, you will understand immediately why this exists.
This guide covers everything: every panel, every button, every feature. By the end, you will know how to use Inclusive Seating as a proper classroom management tool, not just a name shuffler.
Start with the Demo
Before you enter a single student name, click Try a demo in the left sidebar. This loads a fully populated sample class, complete with students, a classroom layout, and pre-set restrictions. You get a working seating chart in seconds, and you can interact with every feature using real-looking data before you commit to setting up your own class.
The demo also activates a set of interactive numbered hotspots (the purple circles) that appear throughout the interface. Each one points at a specific feature and walks you through it in order. Clicking a hotspot completes it and moves you to the next one. It is a good way to discover features you might otherwise miss.
Once you have explored the demo, click Clear all grids in the sidebar to wipe it and start fresh with your own class.
Step 1: Build Your Class Roster
The roster is the foundation of everything. Every student you add here becomes available to be placed into a seat when you randomize. You build the roster using the Add a student panel in the sidebar.
Adding Students One at a Time
Type a student's name into the name field, select their gender (Female, Male, or Other), and click Add student. The student tile appears in the Class roster grid on the right side of the screen. Names must be 20 characters or fewer and can include letters, numbers, spaces, hyphens, apostrophes, periods, and commas. You can have up to 36 students per class.
The gender selection is used for the optional boy-girl alternation feature during randomization. If you do not want to use that feature, or if a student's gender is not relevant to seating, leaving gender unselected is perfectly fine (will default to Other) and will not affect anything except alternation logic.
Bulk Adding Students
If you already have a list of student names, the Bulk add students panel is much faster. Open it in the sidebar, paste your names into the text area (one name per line), and click Import students. The button counts the names as you type so you can see exactly how many are queued up before you commit.
Bulk import skips duplicates automatically. If three of your names are already in the roster, those three are silently ignored and the rest are added. Any names that are too long or contain invalid characters will block the import and show you which ones to fix first.
All students added via bulk import are set to Other gender by default. You can change any student's gender later by clicking the pencil icon on their tile.
Editing a Student
Click the pencil icon on any student tile to open the restrictions panel for that student. At the top of that panel you will find fields to edit both the student's name and their gender. Below that you can edit seating restrictions, which will be discussed in Step 3. Changes take effect when you click Save.
When you rename a student, Inclusive Seating automatically updates every other student's restriction list to reflect the new name. If Alex had a "must not sit near" restriction pointing to the student you just renamed from Jordan to Jord., that restriction updates automatically so nothing breaks.
Tracking Attendance
Each student tile has a person icon at the top. Clicking it toggles the student between present and absent. Absent students are excluded from the seating chart when you randomize, so you do not need to delete and re-add anyone for a day when they are out.
The status banner beneath the roster grid shows you a live count: something like 24/26 present; 8 with restrictions. This is useful for a quick sanity check before you generate a chart.
Sorting the Roster
The roster grid is not alphabetically sorted by default. Students appear in the order they were added. Click the A-Z sort icon in the controls on the left edge of the roster grid to alphabetize the whole roster instantly. This is helpful when your class gets large and you need to find a specific student quickly.
Deleting a Student
Click the trash can icon on a student tile to remove them. When a student is deleted, their name is also removed from any other students' restriction lists automatically.
Step 2: Design Your Classroom Layout
The classroom grid is where you recreate the physical layout of your room. The goal is to build something that looks like your actual classroom, so that when Inclusive Seating places a student "near the teacher's desk" or "away from the exit," those directions mean something real.
Adding Classroom Elements
Open the Add classroom elements panel in the sidebar. The dropdown lists every element type available:
- Flexible seat: A regular seat that the algorithm fills randomly.
- Assigned seat: A numbered seat that can be locked to a specific student.
- Teacher's desk: Marks where you sit or stand most of the time.
- Exit: A door or any other exit from the room.
- Calm corner: A designated de-escalation or self-regulation space.
- Couch: A flexible seating option.
- Library: A reading corner or book area.
- Whiteboard: Your main instructional surface.
- Cubbies: Storage area for student belongings.
Select an element and click Add element. It appears in the classroom grid. Repeat until your layout is complete. You can add up to 48 elements total.
Non-seat elements (teacher's desk, exit, calm corner, and so on) serve as landmark anchors. They do not get filled by students during randomization, but they inform the restriction system. When you tell the algorithm that a student must sit near the teacher's desk, it needs that tile to be present in the grid to calculate proximity correctly.
Using Preset Layouts
Not sure where to start with the layout? Click the magic wand icon in the classroom grid controls (on the left edge of the grid). Each click cycles through a different preset arrangement:
- Traditional rows
- Grouped tables of four
- U-shape
- Circle
- Small groups of three
- Pairs facing each other
- Theater style
- Conference style
Each preset wipes the current classroom layout and fills in a clean arrangement of flexible seats. Use it as a starting point, then add your teacher's desk, exits, and any other fixed elements on top. Keep clicking to cycle through all eight until you find one that roughly matches your room.
Note that generating a preset layout also clears the randomized seating chart, since the seat positions have changed.
Dragging and Dropping
Every tile in the classroom grid can be dragged to a new position. Click and hold any element, drag it where you want it, and release. Drop an element on top of another element to have the two elements swap positions. The grid snaps tiles to fixed cells so everything stays orderly. This is how you match the digital layout to the physical arrangement of your actual room.
Rotating Seat Direction
Each flexible seat and assigned seat has a small arrow icon. Clicking the arrow rotates it through four directions: up, right, down, left. This represents which way a student in that seat faces. The direction is purely visual in the PDF export and in the seating chart grid; it does not affect the randomization algorithm directly. But it makes the printed chart much clearer for a substitute teacher or for a student trying to find their seat.
Setting Room Orientation
Look at the bottom edge of the classroom grid. Two small arrow icons sit there: one pointing left, one pointing right. These rotate the front/back/left/right labels around the grid without moving any of your elements. Click the left arrow and the label that said "front" at the bottom now moves to the left side, indicating that the front of your classroom is now on the left side of the grid.
This matters because restriction directions (front, back, left, right) are relative to the room orientation. For example, if you arranged the classroom grid such that the front of your classroom is on the left side of the grid, you need to change the room orientation to reflect that so a restriction of "must not sit near: back" sends the student to the correct side of the room (in this case, the right side of the grid).
The current orientation labels are shown on all four sides of the classroom grid: top, bottom, left, right. Adjust them until they match how your physical room is oriented. The randomized seating chart inherits this orientation automatically when you generate it.
Deleting Elements
Each classroom element tile has a small trash can icon. Click it to remove the tile from the grid. If you remove an assigned seat, any student whose restrictions pointed to that seat will have their "must sit in" restriction cleared automatically.
You can also wipe the entire classroom layout at once using the eraser icon in the classroom grid controls, or via Clear all grids in the sidebar.
Step 3: Set Student Seating Restrictions
Most seating chart tools let you assign seats manually. Inclusive Seating lets you describe what a student needs and then generates arrangements that honor those needs automatically, every time you click Randomize.
Click the pencil icon on any student tile to open their restrictions panel. You will find three restriction types.
Must Not Sit Near
Use this when a student needs to be kept away from something. The dropdown lets you choose from:
- Specific classmates (every student in your roster appears here)
- Room directions: front, back, left, right
- Classroom elements: teacher's desk, exit, calm corner, library, couch, whiteboard, cubbies
You can select multiple values at once. A student can be set to avoid both the exit and a specific classmate in the same restriction.
Common uses: a student who gets distracted near the door; a student who wanders and needs to be away from exits; a student who struggles to focus near the library corner; two students who feed off each other's energy when seated near each other.
Must Sit Near
The inverse: use this when a student benefits from proximity to something. The options are identical to "must not sit near." A student can be set to sit near both the teacher's desk and a specific supportive peer at the same time.
Common uses: a student who benefits from being close to the teacher for direct support; a student with hearing needs who should be near the front; a student who does better when seated next to a calm, focused peer; a student who needs easy access to the calm corner for self-regulation breaks.
Must Sit In (Assigned Seats)
This third restriction type is different from the other two. Instead of guiding the algorithm, it locks a student to a specific numbered assigned seat. The dropdown lists only the assigned seats you have placed in your classroom grid (the ones using the assigned seat element type, not flexible seats).
Once a student is locked to an assigned seat, the algorithm always places that student there, regardless of any other considerations. Their proximity-based restrictions still apply to the students placed around them, but the student's own location is fixed.
Use this for students who have an IEP or 504 plan specifying a particular seat location,1An Individualized Education Program (IEP) is a legally binding document developed under the Individuals with Disabilities Education Act (IDEA) that outlines the special education services and supports a student is entitled to receive. A 504 plan is a written accommodation plan under Section 504 of the Rehabilitation Act of 1973, which covers students whose disability substantially limits a major life activity but who may not require special education services. Preferred or preferential seating is one of the most common accommodations documented in both plan types, and teachers are legally required to implement it as written. or for students who need the consistency of always knowing exactly where they sit.
Bidirectional Restrictions Are Automatic
When you save a "must not sit near" restriction between two students, Inclusive Seating automatically applies the same restriction in the other direction. If you set Maya to "must not sit near" Jordan, Jordan is automatically set to "must not sit near" Maya. You do not have to open Jordan's panel and repeat yourself.
The same logic applies to "must sit near": setting Alex to sit near Sam means Sam is also set to sit near Alex. This bidirectional behaviour keeps your restrictions internally consistent without any extra effort.
Saving Restrictions
Click Save at the bottom of the restrictions panel when you are done editing a student. The pencil icon on that student's tile will change to a darker color to signal that active restrictions are stored. This gives you a quick visual scan of which students have restrictions set without opening each panel.
Most students need zero restrictions. A handful need one or two. Setting up restrictions takes a few minutes at the start of the year, and then the algorithm handles the complexity every time you regenerate the chart.
Step 4: Randomize Your Seating Chart
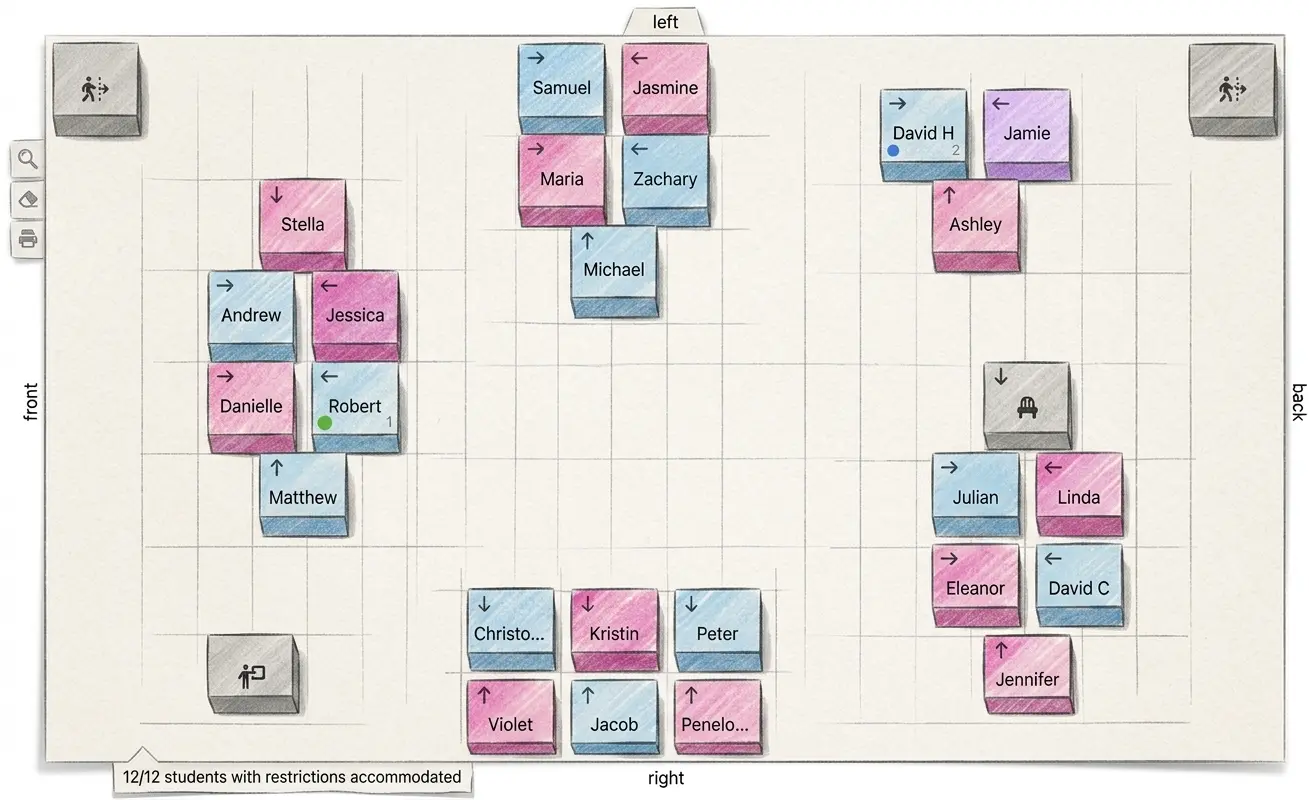
Once your roster is built and your classroom is laid out, click Randomize in the sidebar. A new seating chart appears in the third grid at the bottom right side of the screen, with students placed into seats.
How the Algorithm Works
The randomization algorithm is not a simple shuffle. It works in a specific order designed to satisfy the most constrained students first:
- Students with a "must sit in" (assigned seat) restriction are placed first, always in their designated seat.
- Students with proximity restrictions (must sit near / must not sit near) are placed next. Students with more restrictions are placed before students with fewer, so the trickiest cases get first pick of seats.
- Students with no restrictions at all are placed last, filling the remaining seats.
Within each group, there is controlled randomness. The algorithm scores every available seat for each student based on how well it satisfies that student's restrictions, then adds a small random noise factor. This means you get genuinely different charts each time, not just an optimal solution that would look the same every run.
The Anti-Repeat Logic
Inclusive Seating remembers the previous seating chart and actively penalizes two outcomes when generating a new one: placing a student in the same seat they had before, and placing two students next to each other again if they were already neighbors. This means your students get genuinely fresh arrangements every rotation, not just a slightly shifted version of last time.
This matters more than it might seem. Research on classroom seating rotation consistently shows that the social and attentional benefits of rearranging seats depend on students actually encountering new neighbors, not just sitting one seat away from where they sat before.2Both effects are neighbor-specific, not classroom-wide. Forrin et al. (2024) found that inattentiveness spread only to students seated directly between inattentive peers, not to those one row behind or in front, and not to those seated farther away; students who caught inattention took fewer notes and scored lower on a post-lecture quiz. Faur & Laursen (2022) found that when seat assignments changed, students formed new friendships with classmates who became their direct or near neighbors, not with students seated elsewhere. See footnote for full citation.
Boy-Girl Alternation
If you want the algorithm to try to alternate seating by gender, toggle the Alternate boy-girl switch before clicking Randomize. This is a best-effort feature. It works alongside your student restrictions, and student restrictions always take priority. If you have a lot of "must sit near" or "must not sit near" restrictions, or if your class has an uneven gender ratio, the alternation will be partial rather than perfect.
The toggle setting is saved in your browser, so it persists between sessions without you having to turn it back on each time.
Reading the Status Banner
After randomizing, a small status banner appears below the seating chart grid. It tells you something like 7/8 students with restrictions accommodated. This is the algorithm reporting how many of your constrained students were fully satisfied.
If the number is not perfect, hover over the banner. A tooltip appears listing the names of any students whose restrictions could not be fully met. This is a signal to review those students' restrictions: they might be conflicting with each other, or your classroom layout might not have enough physical space to honor all constraints simultaneously. Sometimes adding an extra seat, shifting a teacher's desk tile, or relaxing one restriction is all it takes.
Fine-Tuning with Drag and Drop
The randomized seating chart is fully interactive. If a generated placement is almost right but you want to swap two students, drag one student tile onto another. They swap positions. This is useful for quick manual adjustments after the algorithm has done the heavy lifting.
Swaps in the seating chart are saved as part of the class when you save, so your manual fine-tuning is not lost.
Step 5: Save and Load Your Class
Inclusive Seating stores everything in your browser's local storage. There is no server, no account, no cloud. Your data lives on your device, which also means it is private by default.
Saving a Class
Open the Manage class panel in the sidebar. Type a class name into the save field (up to 20 characters) and click Save. You can save up to 20 classes. Saving stores your entire roster (including all student restrictions), your classroom layout (including orientation), and your current seating chart all at once.
If a class with that name already exists, saving overwrites it. The "last saved" timestamp updates, and the dropdown in the Load section reflects the change. If you want to keep multiple versions of a class (for example, your morning section and afternoon section), just use different names.
Loading a Class
Select a class name from the dropdown in the Manage class panel and click Load. The tool restores your roster, classroom layout, and seating chart exactly as they were when you saved. The classroom orientation is also restored.
When you open Inclusive Seating in a new session, it automatically loads the most recently saved class. If you have only one class saved, you will never need to manually load it. If you have several, you can choose which to work with from the dropdown.
Deleting a Class
Select a class and click Delete. A confirmation dialog asks you to confirm before anything is removed. Deletion is permanent and cannot be undone.
An Important Note on Browser Storage
Because data is stored in your browser, it is tied to that specific browser on that specific device. Your saved classes will not appear if you switch to a different browser or a different computer. Clearing your browser's cookies, cache, or site data will permanently delete your saved classes, and there is no way to recover them.3This is a fundamental property of browser local storage. Unlike a cloud-backed account, there is no server-side copy of your data. Exporting a PDF before clearing browser data is the simplest way to preserve a usable record of your class.
The practical takeaway: if you are going to clear your browser data, print your roster/classroom layout/seating chart to PDF first (see Step 6). The PDFs will not let you regenerate the chart, but they will give you a record of your class that you can manually re-enter later if needed.
Step 6: Print and Export PDFs
Each of the three grids (roster, classroom layout, randomized seating chart) has a print icon in its control panel on the left edge. Clicking it generates a PDF that opens in a new browser tab, where you can save or print it.
Printing the Roster
The roster PDF exports as a table sorted alphabetically by student name. Each row includes the student's name and a column listing all of their seating restrictions in plain text. This is useful for keeping a paper record, sharing with a co-teacher or paraprofessional, or filing for IEP documentation purposes.
Printing the Classroom Layout
The classroom layout PDF exports as a visual grid diagram in landscape orientation, matching the layout you built on screen. Each element tile is labelled (flexible seat, teacher's desk, exit, and so on) and the room orientation labels (front, back, left, right) appear around the edges. This is handy for a substitute teacher who needs to understand the room setup, or for your own reference when rearranging furniture.
Printing the Seating Chart
The seating chart PDF is the one you will use most often. It exports in landscape orientation as a visual grid with student names in each seat tile. Tiles are color-coded by gender (pink for female students, blue for male, neutral for other). Seat direction arrows are included. The room orientation labels appear around the edges so students or a substitute can orient themselves instantly.
This is the PDF to print and post in the classroom, hand to a substitute, or keep on your desk during the first week of a new seating arrangement.
Putting It All Together: A Practical Workflow
Here is the setup routine that makes Inclusive Seating fast and sustainable across a full school year.
At the start of the year (one-time setup; about 15-20 minutes): Add all your students using bulk import. Use the magic wand to get a starting classroom layout, then drag the tiles around to match your actual room. Add your teacher's desk, exits, and any other key landmarks. Open the pencil panel for the handful of students who need restrictions, set them, and save. Then save the class with your class name.
Each time you want a new seating chart (daily/weekly/monthly; under a minute): Mark any absent students by clicking their person icon. Click Randomize. Check the status banner. If you want to tweak anything, drag and drop in the seating chart. Print the PDF if you like. Save the class to keep the new chart stored.
When your class changes (as needed; a few minutes): Add new students or delete ones who have left. Update restrictions for students whose needs have changed. Randomize and save. The algorithm adapts automatically to the updated roster.
Common Questions and Situations
What if my classroom layout is unusual?
None of the preset layouts will exactly match your room, and that is fine. Use the closest preset as a starting point and then drag tiles to match your actual arrangement. Elements do not have to be evenly spaced or in neat rows. You can place a teacher's desk in a corner, scatter seats in an irregular cluster, or put two exit tiles on opposite walls. The algorithm works with whatever layout you build.
What if the algorithm cannot satisfy all restrictions?
This happens most often in small classrooms with a lot of constrained students, or when two restrictions conflict with each other (for example, student A must sit near the teacher's desk, but the only seats near the teacher's desk are too close to student B, who must not sit near student A). The status banner will tell you which students were not fully accommodated.
The most effective fix is usually to add a seat or two to the classroom grid (giving the algorithm more options), or to review whether any restrictions are truly necessary versus nice-to-have. You can also try randomizing again, since the controlled randomness means a different run sometimes finds a better solution.
What is the difference between a flexible seat and an assigned seat?
Flexible seats are filled by the algorithm and change every time you randomize. Assigned seats are numbered (assigned seat 1, assigned seat 2, and so on) and can be locked to a specific student via the "must sit in" restriction. A student locked to assigned seat 1 will always land in that seat, regardless of what else changes. If no student is locked to an assigned seat, the algorithm treats it like a flexible seat and fills it normally.
The small dot on each assigned seat tile in the classroom grid acts as a status indicator. It glows green when a student is locked to that seat, and stays grey when it is unassigned. This lets you see at a glance which assigned seats are spoken for.
Can I have multiple classes?
Yes. You can save up to 20 separate class files. Each save stores a complete snapshot: roster, restrictions, classroom layout, orientation, and seating chart. Use different names (Period 1, Period 3, Homeroom, etc.) and switch between them using the load dropdown. Loading a class does not delete another; it just brings that class's data into the active workspace.
Does it work without an internet connection?
Once the page has fully loaded in your browser, most functionality works offline. The randomization algorithm, drag and drop, saving, and PDF export all run locally. Load the page once on a good connection before going somewhere without wifi and you will be fine.
Power User Tips
These are the things that separate a casual user from someone who gets maximum value out of the tool.
Try Rotating Seating Every 4 to 6 Weeks
Practitioner consensus generally suggests four to six weeks as a reasonable interval for most classes. Often enough to keep social dynamics fresh, infrequent enough that students have time to settle. Because Inclusive Seating saves your restrictions, each new rotation takes less than a minute. There is no reason not to rotate regularly when the overhead is that low.
Use Assigned Seats Sparingly
Assigned seats are powerful for students who genuinely need a fixed location (accessibility requirements, IEP mandates, severe anxiety about change). But overusing them limits the algorithm's flexibility. A classroom full of assigned seats is just a manual chart that you have entered in a roundabout way. Save assigned seats for the cases where fixed placement is truly required, and let the algorithm handle everyone else.
Export a PDF Before Clearing Browser Data
Print (or save to PDF) your seating chart any time you plan to clear your browser's cache or site data. The PDF is not a backup of the class data, but it is a record of your roster and layout that you can use to rebuild if you need to. Think of it as the equivalent of photographing a whiteboard before erasing it.
Set the Room Orientation Before Adding Restrictions
Before you start adding directional restrictions (front, back, left, right), make sure your classroom grid's orientation labels match your physical room. If you set restrictions first and then rotate the grid, the restrictions still reference the logical direction names (front, back, etc.), so they update automatically. But it is easier to verify everything is correct if the orientation is right from the start.
The Status Banner Is Your Feedback Loop
Do not ignore the status banner after randomizing. 7/8 students accommodated is a useful number, but hovering to see which student was not accommodated is where the real information is. If the same student shows up as unaccommodated across multiple randomizations, their restrictions are worth reviewing. They may be pointing to a seat area that simply does not exist in your layout, or conflicting with another student's restrictions.